Gravel and shingle are both practical and beautiful, but also very easy to lay. Surfaces with gravel provide an affordable solution and add a natural impression to any style of garden. The big advantage of over-molded concrete and asphalt is that you can build your gravel driveway all by yourself.
Below we go through the steps required for a successful installation. Maybe you are looking for a wonderful garden project for the holidays. And it is always extra fun to be able to say that you have done the job yourself. Follow our guide and find your gravel today!
1. The planning stage
It is important to settle down and clear out all thoughts before your upcoming garden project.
What should your driveway look like, how should it be designed, do you need to rent a small excavator? What type of gravel will fit in your driveway? And which curb should you mount for a stable framing of the surface?
Think through your project carefully and feel free to mark up the surface with spray paint, masonry string or similar to get a good overview. It is in this mode that you can easily make corrections to get to your dream driveway.
2. The excavation and preparation
When you have progressed in your thoughts and plans and actually intend to start up your project physically. Then the digging and the preparations are very important to get as smooth a job and as good a result as possible. The general depth to dig out is usually about 15-20 cm. The easiest way to perform this step is to use an excavator, larger or smaller. If you do not want to hire help with this, it is possible to rent mini excavators and machines at many machine rental companies. Classic shovel, edge cutter and a wheelbarrow of course also work but depending on the scale and size of the surface and the project. This obviously takes longer and exposes the body to more stress.
In this step, you should also include the excavation for the curbs or equivalent you intend to install. See our large curb guide for tips and tricks before your curb assembly.
Curbstones stand as supports both for your base layer and for your visible surface putty, to minimize the escape of gravel. Stones that are loose usually want to move easily.
Get your surface bearing.
Lay non-woven fabric against the bottom of your excavated surface. This ensures that the base layer does not mix with the soil and the material you have now excavated. Make sure that the non-woven fabric goes up towards the edges and is mounted with an overlap where the warps join. This is so that the canvas can follow the movements that can take place in the ground over time.
Then fill up your surface with a base layer/rock crusher and level off. We recommend using dimensions 0-32 for as stable a core as possible. Fill up with approx. 15 cm and pack your surface with a so-called ground vibrator. And when you fill up, think of working in layers so that the entire depth is properly packed. Ground vibrators and so-called vibrators can also often be rented from your local machine rental company.
And remember to pack properly and in many batches to make sure your surface is stable.
Some surfaces are basically more stable than others, and therefore choose a depth on your bearing layer accordingly. Feel free to consult us at Stenbolaget in your specific soil conditions.
Time to give your surface its final look.
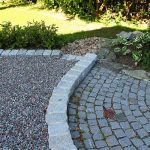
At this stage, your choice of gravel or shingle will play a big role in the appearance of your surface. In our range, you will find a number of different options in both different sizes, colors and surface treatments. It is your visible surface that will be the final design but also carry your vehicle. Yard gravel, shingle and many different types of decorative stone are available to choose from. This layer usually has a thickness of about 4-5cm. Try to find a stone that works for the rest of the garden and your house is our best tip. A single is rounder and gives a good surface that also gives a comfortable surface to walk on.